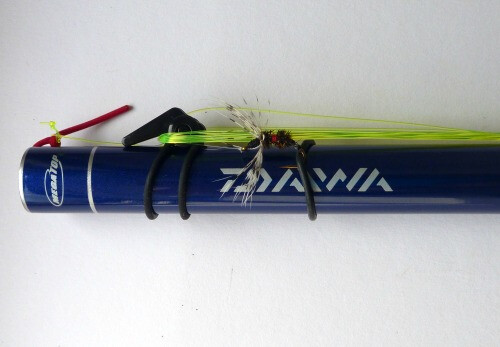
Button And Rubber Band Line Keepers

I do not know about you but I have found Line Keepers to be a very handy item to have on a T-rod for changing fishing locations, whether the rod is taken down or not, but not for long term line storage as the line gets kinky if it is left on the keepers for too long.

Early on I bought some of the commercial line keepers available from a couple of different makers, but I like the low profile and better security that the Button Keepers provide over what the commercial ones offer.

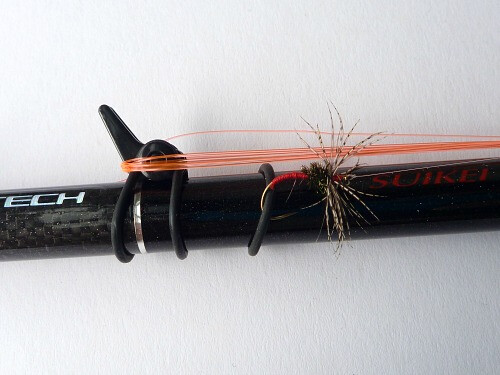
On the Buttons and Rubber Band Keepers: This was not my idea at all. I saw it on a YouTube Video put up by a T-angler in the UK. I have tried to find it again to put up here with no success. The only thing I have contributed to this was using a length level FC line to loop through the rubber band to pull it through the button holes half-way on each side of the button.

To mount the Keeper on the rod, you position the button on top of the rod blank where you want it to go and hold it there with your thumb, while stretching out the first loop and wrapping it around the rod blank 1 and1/2 times or more depending on your rod blank diameter, then loop the rubber band over the button to secure it in place. Then you do the same thing all over again with the second rubber band loop, but going in the opposite direction. By pulling the button up off of the rod blank surface a bit, you can push and prod the rubber band wraps under the button and make them more even.

The rod blank is bigger in diameter at the grip end than at the the rod plug end, so I like using a larger diameter button in front of the rod grip than below the rod plug, and a wider button diameter than the rod blank is wide is also most helpful.

If a Universal Rod Cap is used on your rod, you will have to mount the top button keeper low enough on the blank so the cap can be secured. In putting your line on the keepers, it is a safer practice for Rod Tip Safety and Security to take one complete wrap around the top Button with the line attachment loop to secure the Lilian and tip in the rod before winding the rest of your line on the button keepers.

On the grip keeper, I like to mount it high enough on the rod blank that there is enough room to place my index finger directly on top of the rod blank in front of the grip for more sensitive strike detection.

Doing these things will slightly reduce the length of line that can be figure-eight wrapped between the two buttons to eliminate line twist, but that is compensated for by simply making more line wraps. An adjustable Fly Keeper can be made out of a separate rubber band, with an Overhand Loop tied in one end of the rubber band then wrapping the rubber band around the rod blank and then Half-Hitching it in place to secure it, or you can simply wrap the line around which ever button the fly is closest to a couple of times to secure the tippet near the fly.

On Button Choices and Types: Buttons can be bought in all kinds of colors, sizes and shapes. You can match your rod color if you so desire but a contrasting color is helpful in the shade and In low light conditions. Buttons mostly come in Two and Four Hole configurations. For the 4-holders, you want to pull the rubber band through the holes diagonally. The 2-hole models often have a trench the sewing thread runs through for abrasion protection, which is the style I like the best. A slight concave side ways profile is also helpful for easier line winding.

Rubber Band Sources and durability issues: In this day and age, probably not many of you subscribe to a News Paper, so you may not have a steady supply of rubber bands coming to your home on a daily basis. The people who deliver the papers have to buy the rubber bands they use, so there are still rubber bands out there to be bought - try the Dollar Stores, or if you want fancy colors, Stationary and Office Supply Shops. With time and sun exposure, rubber bands will loose some of their elasticity, become weak and eventually break, usually about two to three years down the road. And if they break, you will probably loose a button. While This is not the end of the world in the total scheme of things, it never hurts to check their condition as you do your normal rod upkeep and cleaning. So give the Button Keepers a try and see if you do not like them better than what you can buy, and your imagination is the only limit on the customization you can build into doing your own Button Rubber Band Keepers…Karl.
Karl, I have switched to the line holders sold by DRAGONtail Tenkara. However, I only use them while fishing, since line left on for a couple of days gets some pretty sharp kinks in it. When I’m done for the day I spool my line on round line holders.

1 Like

Tippet Fly Pouch

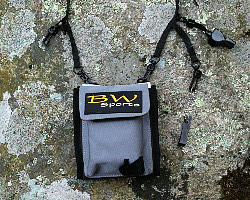
The Tippet Fly Pouch is BW Sports’ entry into the minimalist chest pack field. Although simplicity and minimalism are not the same, many American anglers attracted to the simplicity of tenkara are realizing that they do not need all the gear they carried as fly fishermen. More and more are abandoning their vests in favor of small chest packs. The pouch comes on a lanyard that has several clips for nippers, an emergency whistle, etc., and the pouch itself holds a small fly box, tippet, and all the tenkara lines you could possibly want.

Let me rephrase that. It holds all the tenkara lines even I could possibly want. On any given day I usually test several different lines with a variety of rods, and I rarely have fewer than half a dozen lines with me.

Tippet Fly Pouch Front ViewTippet Fly Pouch Front View

For some time I’d been looking for a leader wallet to hold the lines I do carry. I had seen a number of different small bags or pouches or chest packs, but they all seemed too large for what I wanted.

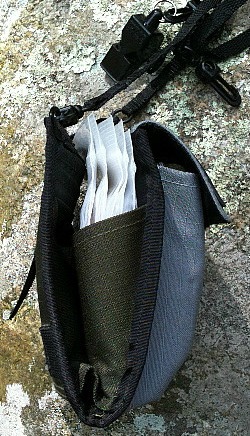
The main reason I chose the Tippet Fly Pouch was that it incorporates a leader wallet in the bag. There are five zip closure envelopes that can be removed (as a unit). Each envelope is 4.25" by 4.75" inside the zip part.

Tippet Fly Pouch side viewTippet Fly Pouch side view

Although BW Sports makes a fly box to go with the Tippet Fly Pouch, I do not stock it and sell the pouches without the fly box. I much prefer the Easy Grip box, which just barely fits in the pouch, or the small Morell Fly Box, which slides into the fly box pocket with enough extra room to hold a Varivas tippet spool.

The TenkaraBum minimalist fly box leaves enough room for two Varivas spools. There is room for a bottle of floatant, too, if like me you enjoy fishing a CDC & Elk.

On the back side of the main compartment, and also on the back of the pouch itself are three pockets that will easily hold flat items (like a Tip Grip) but will also hold a Varivas tippet spool.

When I first got the Tippet Fly Pouch, and before I actually used it, I was a little concerned that the main part of the pouch doesn’t fully close. It’s an open pocket that is held tight by a velcro strap, but I thought it might not be secure for carrying small items. After using the the pouch for quite some time now, that has never proven to be a problem. I don’t carry any small items that don’t fit on the lanyard clips.

From this point on it it is T- Stillwater speaking and not Chris… I carry my lines coiled individually and placed in the Zip-Lock Bag Book Pages of the BW Tippet Pouch with identifying labeling, and a C&F DESIGN UL Light 10 Row Fly Box that measures - 4.25 X 3 X 1” Deep, with the lid carrying 4 different colors and sizes of Down Wing Attractor dry fly patterns, and 1 row of High Country Hopper patterns. The bottom of the box carries 2 sizes of Two-Toned Beetle patterns, one row of the Well-Hung Foam Spider patterns, 2 rows of #12 & #16 Two-Toned X-Rated Ant patterns, and 6 Purple Haze, Pheasant and Chartreuse Soft Hackles, for just in case the dry flies do not work.

I also carry an Ebira Guide model Rod Quiver, containing 2 T-rods, Hemostats, floatant paste, line nippers, 6X tippet spool, magnifiers, a thermometer, insect repellent, a Fishing License, all in the front strap pouch, with a Lighter, a small Knife, Matador Sit Cloth, a segment grip pad, and a 3m Titanium Line on its spool in the back pouch mounted on the back of the Ebira. The only times I do not carry the Ebira is when I am fishing out of a float tube.

For my Stillwater fishing, I carry a Fishpond Chest Pack, with the above mentioned dry fly box in an external zippered pouch, plus a C&F Design 3 - 9/16 X 4 - 7/8 X 1 - 3/8” Deep, 3-Level UL Fly Box Carried inside the pack, containing the following fly patterns:

The Lid - The Olive, Blue and Grizzly Herl Things; The Black, Orange and Gray # 12 Sheeps Creek Fly Patterns, and the # 14 Blue Tag, #14 Orange Tag and The #14 Green Tag Sheep’s Creek Fly Patterns.

On the middle Leaf, the #16 Blond, #14 Red Butt, #12 Orange, and #12 White Midge Pupa patterns, along with the #14 Orange and #14 Black Midge Emerger Patterns, Plus the #12 Blue/Gray, #14 Pink/Oyster, #16 Orange/Autumn and the #16 Green/Gray Pregnant Killer Scud Patterns.

On the Bottom: The #14 Bloody/Black, #14 Orange/Orange, #14 Green/Black and The #14 Blue/Chartreuse Slinky Fly Patterns, The #12 Shakey Beeley Pattern, and The #12 Green and #12 Orange Tenkara Intruder Fly Patterns.

Plus 5X FC. Tippet material and a headlamp in the pack, with a Plunger Style Set of Hackle Pliers and a Line Nipper carried out side the pack on a Zinger. Also, inside the pack is a 6-page Leader Book carring 3 Different lengths of Floating fly lines with leaders, 4 different lengths and sizes of Level FC. T-lines, and 3 different lengths and different densities of Sinking Fly Lines, Plus one 12 foot long Furled Tapered FC. Sinking T-line, to cover everything from small high mountain streams, high lakes, float tubing and boat trolling. The Chest Pack is 4” thick X 6” wide and 8.5” high. That is a lot of tackle packed into not very much space for very little weight…Karl.

I recently switched to buttons and rubber bands (thanks Karl!) and I love them! The rubber bands have a grip to the line, holding it together a bit better. Once installed tightly, the buttons have not moved.

Do you have any pics of the button and rubber band setup on the rod? I’m wondering how that would look.

I will send a pic of my set up later. I have been considering permanently attaching the buttons using guide threads and epoxy (used in rod building). Would look cleaner, but would not have the rubber gripping capacity.

2 Likes

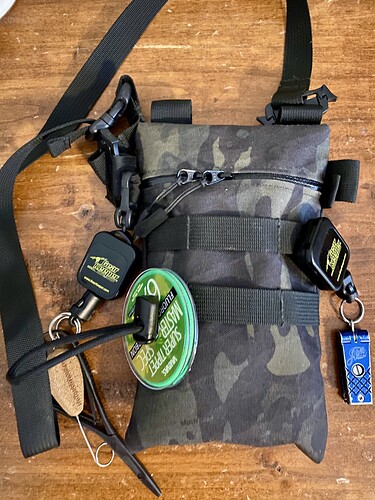
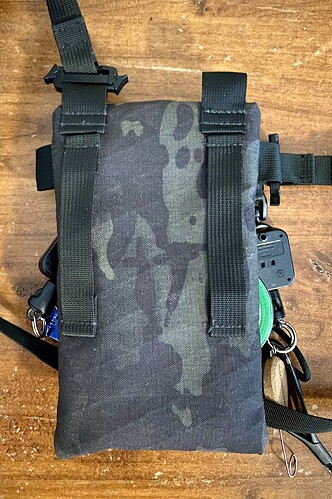
I go back and forth on what I like carrying my tackle in. It also depends on where I’m going of course. If I know I’ll be hiking a long ways I’ll take the backpack. But for pull up and go fish little creeks I do like a small chest pack. I made this one which I’m liking. It fits a tacky box, daypack or even the taller ones. I made it tall enough to fit my iPhone 11 Pro Max so I can quickly pull it out to take pictures. I put attachment points so that it works well as a sling bag, chest bag or even fanny pack style. There are belt loops on the back so I can attach it to a wading belt or my regular pants belt.


2 Likes

For a visual of what the Button and Rubber Band Line Keepers Look like on a rod, here is a link:

https://www.amazon.com/tenkara-line-holder/s?k=tenkara+line+holder

You will need to scroll down to find the photo, of the Button and Rubber Band Keepers, Each time I checked the position, it jumped to a new position, so I can not provide an exact position, But they do look like Buttons, so they should be easy enough to locate. And, of course, the Right Hand Keeper would be moved to the right as far as is possible to wind the line on the rod as quickly as possible with the fewest wraps.

Clicking on the description, will allow you to access a magnified image that better shows how the buttons mount and look on a rod. I prefer to use a smaller button on the top and a bigger one on the bottom. Winding the line on the keepers in a Fig-of-8 pattern prevents line twist better than wrapping it on in a circular motion…Karl.

1 Like

I have tried both easy keepers and the clip on line holders but since I have gone back to using a Tenkara Times 1st Step 360 and Esoteric ESO TENKARA ZOOM 245-206 the line holders don’t fit and I find the essay keepers a bit flimsy. However all is not lost as Esoteric- https://esoterictackle.co.uk/home/198-ufo-spools-0610822166503.html - now sell UFO spools which are very cheap but very easy to use.
I can definitely recommend them.

David

1 Like

i made these out of deer antler and plain ole rubber bands. after using them for a few weeks, i prefer clip on line winders.

1 Like

The Ultimate Tenkara Line Holder from Dragontail:

i bought a pack of these. used them for a few months and went back to the snap on winders and foam spools on all my rods. the thing i didnt like is that when you wrap your line around them and you have 5” of line left that you can’t hook your fly to anything. So I started wrapping the last 5 inches of line around the rod and hooking it onto the O-ring. That worked fine for Rod storage but when I got to the water and unwound everything to fish, now I have 5 inch pigtail curl right before my fly that i had to straighten out.

maybe i was using them wrong. i dont know. the snap on winders are just so much easier to use and store lines.

I’m with Neil_Young, I tried them and went back to spools; plus a snap on winder in my pack in case I need one in the heat of battle…
I’m sure its just my crude technique, but I found that no matter how/where I hooked a fly, it would get snagged when pulling the rod sock on or off.

A question for people who use rubber bands or O-rings: do you ever see rods break where the bands have been sitting for a while?

Harry

1 Like

Neil, Harry and all, I use the on the rod line winders for changing fishing locations on lakes or streams only. Not at all for long term line storage or carrying the rod in a sock or rod Ebira, or strapped to a pack. If you will notice, the Ultimate Line Keeper pictured above has an integrated line clamp for securing the fly end of the line. Please watch the video for a demonstration of how it works.

I carry my lines coiled in the Ziplock books that come in Leader Wallets, which are available and sold separately as replacements. Usually, they come 5 to 6 envelopes to a book, and you can double your line storage by cutting white plastic advertising sings up to fit in the ziplocks and marking them with H2O Prof Felt marking pens for line size, taper or level, and line length, which is much more compact and lighter in weight than an equal number of line spools would be. But, what ever works out the best for you is the right way to go…Karl.

Here is a link to Some Leader Wallets (10 compartment models are also available from some makers) for visual reference:

1 Like

Here is a listing on the Leader Wallet Insert Book

I use snap-on line winders rather than spools over my rod to store lines on a rigged rod because I will change rods and strap the first rigged rod down in a 6" high side pocket of my sling pack. I don’t want to snag the line while bushwhacking. And I normally don’t put a rod back in the sock after I rig it with a line winder.

I am vacillating on whether to try the newer UTLKs.

To complicate things my line length changes every time I tie on a new fly or add tippet.
When I tried the Fuji line keepers on my GM-53 I put an O-ring between the keepers that I would move to wherever the hook was between the keepers and hooked the fly under that O-ring. As suggested on Chris’ Fuji page…

The big Fuji fail for me was one of the keepers flipping down and releasing the line causing a birds nest. I tried using them backwards, as also suggested by Chris


but I still had my line come off and birds nest. So I said “Goodbye Fuji!” and found a snap-on Keiryu rod line winder. It doesn’t have a foam strip so I have O-rings at each end of the winder.

The snap-on winders from DT include the long foam strip to hook my fly into which in theory should prevent snagging the fly.
I suspect using an extra O-ring with the UTLKs would keep the hook point so close to the rod blank that it wouldn’t catch the sock, but it could.

I’m more concerned about scratching the rod with the hook point enough times that it could become more than superficial.

2 Likes

One of the things I dislike about the snap on line keepers is how short they are, requiring mor turns to get all the line on them. DT’s Ultimate Line Winders do not fold up or gown, ln addition to having the line clamps, eliminating the need for an o-ring on the rod blank as a hook holder. A rubber band could be connected under the line clamps, giving you the adjustability of however much stretch the rubber bands have at each end of the line winder to hook your fly through and keep tension on the tippet material.

Regardless of what type of line winder is used, Fig-8ing the line keeps the line from getting twisted and adds more line storage capacity to what ever kind of line winder you use…Karl.

In getting a pack of the Ultimate Line Keepers, there are a lot of various sized o-rings in the bag to fit a wide range of different sized rod butt blanks, so you will have a lot of o-rings left over after mounting the Ultimate Line Keepers.

The left over o-rings can be used (loop-to-looped together) to mount button line keepers on your T-rods as well. The button keepers are much lower in profile (just the thickness of the buttons you choose to use) and hold the line much more securely than the EZ Keepers and others can, and the black o-rings are a lot more presentable on rods than the many wraps the rubber band material require to use up all the extra rubber band material, and you can place the front rod cap button much closer to the rod’s tip cap than the other types of linekeepers allow you to do, making for increased line storage with fewer fig-8 line wraps on the rod.

Loop 2 o-rings together and tighten the knot. Run a heavy length of tippet or line looped through one side of the joined o-rings, and stick it through a button hole pulling the o-ring half through the button hole until the knot is tight to the top of the button, now do the same with the other side of the joined o-rings on the opposite side of the button. Set the button on top of the rod where you want it to go and and press down firmly from above, while wrapping the o-ring half on one side of the button around the rod blank, and loop it around the other side of the button. Now do the same with the other side of the joined o-rings and your button line keeper is complete.

You may need to make some minor adjustments in the button position, which can be accomplished by lifting up on the button and sliding it to where you want it to end up, pushing on the o-ring wraps (2 per side) to get things lined up and close together for a tidy finished looking line keeper. The o-rings last a lot longer than the rubber bands did. I know because I often used o-rings on the rod blank as hook keepers and I never had to replace an o-ring hook keeper on the rods with rubber band line keepers.